10 Apr, 2009, Asylumius wrote in the 2nd comment:
Sounds neat. All I got by running it was a frozen gray screen on Debian 5 / java 1.5.0 / libgcj 4.3.2. If anyone has better luck, feel free to elaborate.
10 Apr, 2009, Littlehorn wrote in the 3rd comment:
Haven't tried with Linux but it works well on Windows. As long as you have the latest java runtime environment (jre) installed it should work, otherwise maybe it's not 100% compatible with Linux as it says. :D
10 Apr, 2009, Littlehorn wrote in the 4th comment:
This may help. It's the original readme. Sorry it's not included but the site I'm using to snag this is no longer online nor supported. This is why I wanted to upload it here so it never goes offline again.
—–
Installation:
————
All the files needed are packed in MapMaker.jar, which you should copy
into the directory you want mapmaker to be. (e.g. ~/mapmaker or
c:\mapmaker - and if the latter, you might also consider switching
your OS for a REAL one .. ;).
Next, you need to extract a few files with the jar tool, which comes
with the jre. The command to extract the needed files is
> jar xf MapMaker.jar doc maps
This will extract two directories, doc and maps. The doc directory
contains help files MapMaker needs, while maps holds a few sample
maps.
To run MapMaker, you should be in the mapmaker directory. If you are
not, MapMaker will not display any help, though all else should
function properly. Now to execute MapMaker, all it takes is
> java -jar MapMaker.jar
Tools:
—–
The tools that come with MapMaker are described in tools.readme, which
you can extract from MapMaker.jar by calling
> jar xf MapMaker.jar tools.readme
—–
Installation:
————
All the files needed are packed in MapMaker.jar, which you should copy
into the directory you want mapmaker to be. (e.g. ~/mapmaker or
c:\mapmaker - and if the latter, you might also consider switching
your OS for a REAL one .. ;).
Next, you need to extract a few files with the jar tool, which comes
with the jre. The command to extract the needed files is
> jar xf MapMaker.jar doc maps
This will extract two directories, doc and maps. The doc directory
contains help files MapMaker needs, while maps holds a few sample
maps.
To run MapMaker, you should be in the mapmaker directory. If you are
not, MapMaker will not display any help, though all else should
function properly. Now to execute MapMaker, all it takes is
> java -jar MapMaker.jar
Tools:
—–
The tools that come with MapMaker are described in tools.readme, which
you can extract from MapMaker.jar by calling
> jar xf MapMaker.jar tools.readme
10 Apr, 2009, Asylumius wrote in the 5th comment:
Yeah, I extracted that from the jar and read it. The program runs, but it locks up and simply doesn't work. Oh well.
10 Apr, 2009, David Haley wrote in the 6th comment:
Maybe running it with the Sun JVM will get you better results – that's been my experience in general at least. (Haven't tried on this particular program.)
10 Apr, 2009, Kline wrote in the 7th comment:
I didn't extract anything, just ran the jar direct (Vista x64, JRE 6u12). I can manage to click and create small boxes, and if I right click in those they expand to a white box with 9 smaller boxes inside it…But I can't figure out how to do anything more productive than that :P
12 Apr, 2009, Littlehorn wrote in the 8th comment:
Kline said:
I didn't extract anything, just ran the jar direct (Vista x64, JRE 6u12). I can manage to click and create small boxes, and if I right click in those they expand to a white box with 9 smaller boxes inside it…But I can't figure out how to do anything more productive than that :P
That's how the program shows you that you have selected that box. You can then set it's color or edit it's description. It's like the programs highlight option for the rooms. Kind of generic and confusion I know but that's how he made it. The basic things to do is to click boxes (rooms) in the way you want your area to be then link them all up in the same manner. Then convert it to ROM format and you both have the area file and a graphical visual representation of the area you made.


12 Apr, 2009, Littlehorn wrote in the 9th comment:
Some more that I made real quick. Spent about 30 minutes making both of these.


12 Apr, 2009, Kline wrote in the 10th comment:
I guess I still haven't figured out how to link things together and do more than make a lot of freestanding boxes :)
12 Apr, 2009, Littlehorn wrote in the 11th comment:
It's easy when you get the hang of left-clicking and dragging between boxes. You can drag between any number of boxes and link a crazy amount together. It even support ne, nw, se, sw, etc (have to drag to the corner of the box).
12 Apr, 2009, Littlehorn wrote in the 12th comment:
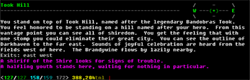
Up/Down is a bit harder. You have to select the box by right-clicking in the middle of the box itself to pull up the highlight tool (10 smaller boxes). Then link the top middle box (of the 10 smaller boxes) to the box you would like it to have an exit up from. It requires some zooming and deletion of the link that goes to the east/west/north/south of the box so you can leave the up/down links. (hard to explain).
Here is a image of what an up exit looks like.
Final cut of the up/down example:

Raw screenshot of how to do it:

Here is a image of what an up exit looks like.
Final cut of the up/down example:
Raw screenshot of how to do it:
Random Picks
I just uploaded the MapMaker.jar tool developed for designing graphical maps for MUDs. It's not a tool for detailed graphical map design but something to give you a good layout of ones area. The cool thing is, you can make a map and then convert it to ROM/ROT area format for your MUD. It's a great tool for Builders that want to make a skeleton area design and have visual representation of that area while being able to convert your creations to your ROM/ROT whatever works MUD.
It runs on Windows/Linux and you can find more information on the upload I did – http://www.mudbytes.net/index.php?a=file...
It's no longer supported but the tool is so great.